はやぶさ 2 の打ち上げ,再延期になっちゃいましたねぇ。 12 月 3 日 (水) 13 時 22 分 04 秒の予定だそうです。三度目の正直で,今度こそ晴れてほしいなぁ。
さて, SELinux を有効にしたままで, CentOS7 上に LAMP を構築しようと思う。
LAMP 構築に先立って,以下の 3 4 つをやった。
- $
sudo vi /etc/pam.d/su
下記の行をアンコメントする。
#auth required pam_wheel.so use_uid–>>auth required pam_wheel.so use_uid
これで, Wheel Group 外のユーザは ‘su’ コマンドを使っても, root にはなれなくなった。 - $
sudo vi /etc/aliases
ファイルの最下行をアンコメントし,ユーザ名を変更する。
#root: marc–>>root: centos
$sudo newaliases
これで,ユーザ centos が root 宛てのメールを受け取れるようになった。 - タイムゾーンをチェックする。
$sudo timedatectl status
特に,問題なし。
$sudo systemctl status chronyd.service
結果に, “System clock wrong by 1.088336 seconds, adjustment started” というのがあったので, /etc/chrony.conf を編集した。
$sudo vi /etc/chrony.conf
中に “# Use public servers from the pool.ntp.org project.” と書いてあったので, pool.ntp.org に行ってみたら,使い方があった。その指示に従って, ‘+’ の 4 行を追加し, ‘-’ の 4 行を削除した。
+server 0.pool.ntp.org iburst
+server 1.pool.ntp.org iburst
+server 2.pool.ntp.org iburst
+server 3.pool.ntp.org iburst
–server 0.centos.pool.ntp.org iburst
–server 1.centos.pool.ntp.org iburst
–server 2.centos.pool.ntp.org iburst
–server 3.centos.pool.ntp.org iburst
サービスを再起動して,確認。
$sudo systemctl restart chronyd.service
$sudo systemctl status chronyd.service
よくなった。 - パッチ自動更新用。
$sudo yum install yum-cron
$sudo vi /etc/yum/yum-cron.conf
行番号 20:apply_updates = no–>>apply_updates = yes
$sudo systemctl start yum-cron.service
$sudo systemctl enable yum-cron.service
1 Apache Httpd のインストール 2 MariaDB のインストール 3 PHP のインストール
4 phpMyAdmin のインストール 5 vsftpd のインストール
||Apache Httpd のインストール||
- $
sudo yum install httpd
インストールされたバージョンは, httpd.x86_64 2.4.6-18.el7.centos だった。 - /etc/httpd/conf/httpd.conf を編集する。
$sudo vi /etc/httpd/conf/httpd.conf
‘:set nu’ で行番号を表示する。- 行番号 42:
Listen 80–>>Listen Server_global_IP:80 - 行番号 86:
ServerAdmin root@localhost–>>ServerAdmin My_email_address - 行番号 95:
#ServerName www.example.com:80–>>ServerName VPS_DomainName:80 - 行番号 119:
DocumentRoot "/var/www/html"–>>DocumentRoot "/home/centos/www/html" - 行番号 124:
<Directory "/var/www">–>><Directory "/home/centos/www"> - 行番号 131:
<Directory "/var/www/html">–>><Directory "/home/centos/www/html"> - 行番号 144:
Options Indexes FollowSymLinks–>>Options FollowSymLinks - 行番号 151:
AllowOverride None–>>AllowOverride FileInfo Indexes Limit
うちの場合,この行の変更は, WordPress のためである。 - 行番号 164:
DirectoryIndex index.html–>>DirectoryIndex index.php index.html
- 行番号 42:
- 注) exstra.conf の場所:
/etc/httpd/conf.d
デフォルトの exstra conf : autoindex.conf, userdir.conf, welcome.conf - 注 2) module.conf の場所:
/etc/httpd/conf.modules.d/ - 注 3) log ファイルのローテートの設定をしていないのだが, Apache Httpd が自動でやってくれているようだ。(サーバを 1 日以上稼働したのち,
/var/log/httpd/を見たら,日ごとの log になっていた)。いつからこうなったんだろう?それとも, CentOS7 固有の機能なのか? - 通常,ユーザのホームディレクトリのパーミッションは 700 であるが, httpd のアクセスを許可するために, 701 にしておかなくてはいけない。このことは, userdir.conf に書いてあった。
$chmod 701 centos - DocumentRoot をユーザホームディレクトリに割り当てたので, httpd がアクセスできるように, SELinux の設定を変更する。これについての情報は, httpd_selinux(8) にあった。しかし, CentOS7 で見ようとしたら httpd_selinux(8) が空だったんだが,どうしてだろう。
この際,オンラインの httpd_selinux(8) をご覧あれ。
$sudo setsebool -P httpd_enable_homedirs on
$sudo systemctl start httpd.service
サービスを起動したら,エラーメッセージ “Job for httpd.service failed. See ‘systemctl status httpd.service’ and ‘journalctl -xn’ for details.” が出ちゃった。ユーザディレクトリに ‘www’ と ‘html’ を作るのを忘れてた。ユーザ centos として,以下の作業をやった。
[centos@localhost ~]$mkdir www
[centos@localhost ~]$cd www
[centos@localhost www]$mkdir html
ここで,両ディレクトリの context を確認しておく。
$ls -Z
drwxrwxr-x. test test unconfined_u:object_r:httpd_user_content_t:s0 www
$ls -Z
drwxrwxr-x. test test unconfined_u:object_r:httpd_user_content_t:s0 html - 再度, $
sudo systemctl start httpd.service - $
sudo firewall-cmd --permanent --zone=public --add-service=http
Httpd テストページ sudo firewall-cmd --reload
$sudo systemctl enable httpd.service
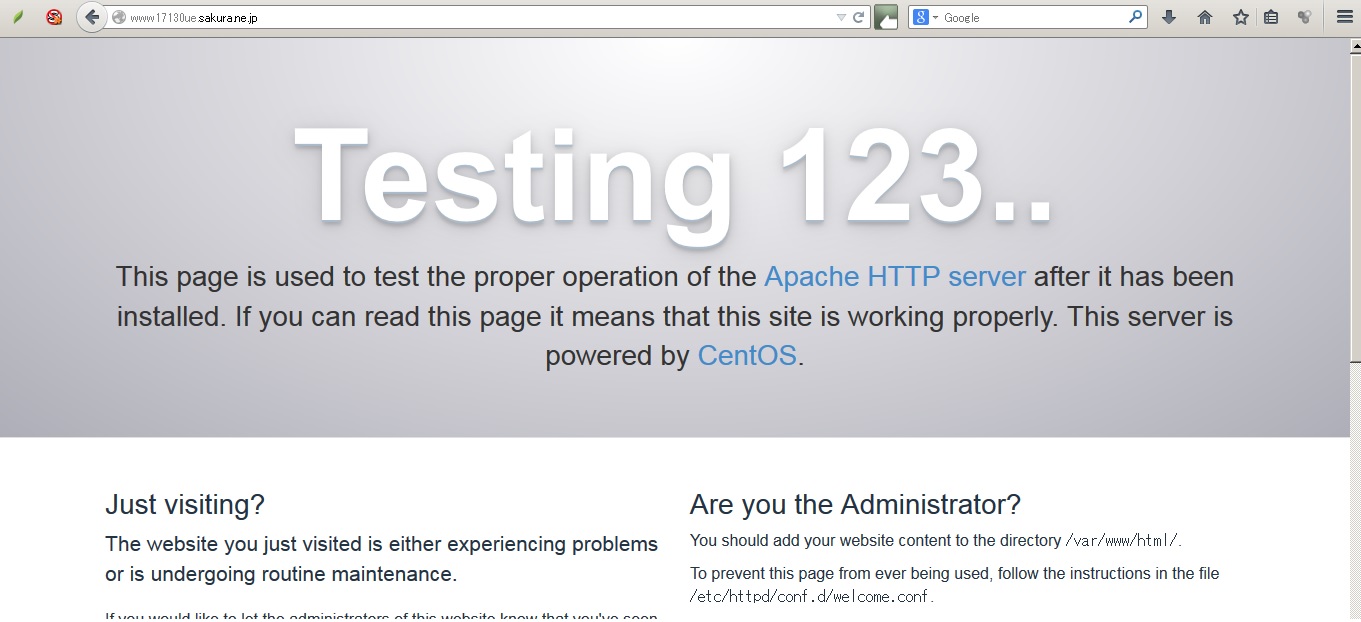
注 4) 各 Well-Known-Port の設定は,前もって済んでいるみたいだ。そんなわけでポート 80 についての firewall-cmd はいらない模様。 - http://VPS_DomainName/ にアクセスすると,右の図のようなページが見えるはずである。
||MariaDB のインストール||
- $
sudo yum install mariadb-server mariadb
インストールされたバージョンは, mariadb.x86_64 1:5.5.40-1.el7_0 と mariadb-server.x86_64 1:5.5.40-1.el7_0 だった。 - $
sudo systemctl start mariadb - $
sudo mysql_secure_installation
Enter current password for root (enter for none): <<-- [Enter] キーを打つ。 Set root password? [Y/n] <<-- [Enter] キーを打つ。 New password: <<-- root のパスワードを設定。 Re-enter new password: <<-- パスワードの確認 = もう一度打つ。 以下の項目については, [Enter] キーを打つ⇩。 Remove anonymous users? [Y/n]
Disallow root login remotely? [Y/n]
Remove test database and access to it? [Y/n]
Reload privilege tables now? [Y/n] - $
sudo systemctl enable mariadb.service
||PHP のインストール||
- $
sudo yum install php php-mysql php-mbstring
インストールされたバージョンは, php.x86_64 5.4.16-23.el7_0.3 , php-mbstring.x86_64 5.4.16-23.el7_0.3 , php-mysql.x86_64 5.4.16-23.el7_0.3 だった。
php.conf はインストール時に,自動的に/etc/httpd/conf.dに作られる。 - /etc/php.ini を編集する。
$sudo vi /etc/php.ini
‘:set nu’ で行番号を表示する。- 行番号 243:
output_buffering = 4096–>>output_buffering = Off - 行番号 314:
disable_functions =–>>disable_functions ="shell_exec, suexec, passthru" - 行番号 375:
expose_php = On–>>expose_php = Off - 行番号 811:
allow_url_fopen = On–>>allow_url_fopen = Off - 行番号 878:
;date.timezone =–>>date.timezone ="Asia/Tokyo"
注 5) additional.ini の場所:
/etc/php.d
デフォルトの additional ini: curl.ini, fileinfo.ini, json.ini, mbstring.ini, mysql.ini, mysqli.ini, pdo.ini, pdo_mysql.ini, pdo_sqlite.ini, phar.ini, sqlite3.ini, zip.ini - 行番号 243:
- $
sudo systemctl restart httpd.service
||phpMyAdmin のインストール||
- phpMyAdmin がほしいんだが, base, extras, updates リポジトリにはなかったので, ‘epel’ を追加することにした。
$sudo yum install epel-release - $
sudo yum install phpmyadmin
インストールされたバージョンは, phpMyAdmin.noarch 4.2.11-1.el7 だった。
phpMyAdmin.conf はインストール時に,自動的に/etc/httpd/conf.dに作られる。 - /etc/httpd/conf.d/phpMyAdmin.conf を編集する。
$sudo vi /etc/httpd/conf.d/phpMyAdmin.confうちの phpMyAdmin.conf は下記のような感じ。
# phpMyAdmin - Web based MySQL browser written in php
#
# Allows only localhost by default
#
# But allowing phpMyAdmin to anyone other than localhost should be considered
# dangerous unless properly secured by SSLAlias /phpMyAdmin /usr/share/phpMyAdmin
Alias /phpmyadmin /usr/share/phpMyAdmin<Directory /usr/share/phpMyAdmin/>
AddDefaultCharset UTF-8<IfModule mod_authz_core.c>
# Apache 2.4
<RequireAny>
Require ip my_global_IP
Require host my_mobile_host
</RequireAny>
</IfModule>
</Directory><Directory /usr/share/phpMyAdmin/setup/>
<IfModule mod_authz_core.c>
# Apache 2.4
<RequireAny>
Require ip my_global_IP
Require host my_mobile_host
</RequireAny>
</IfModule>
</Directory> - $
sudo systemctl restart httpd.service
||vsftpd のインストール||
- $
sudo yum install vsftpd
インストールされたバージョンは, vsftpd.x86_64 3.0.2-9.el7 だった。 - Edit /etc/vsftpd/vsftpd.conf.
$sudo vi /etc/vsftpd/vsftpd.conf
‘:set nu’ で行番号を表示する。- 行番号 12:
anonymous_enable=YES–>>anonymous_enable=NO - 行番号 82:
#ascii_upload_enable=YES–>>ascii_upload_enable=YES - 行番号 83:
#ascii_download_enable=YES–>>ascii_download_enable=YES - 行番号 100:
#chroot_local_user=YES–>>chroot_local_user=YES - 行番号 101:
#chroot_list_enable=YES–>>chroot_list_enable=YES - 行番号 103:
#chroot_list_file=/etc/vsftpd/chroot_list–>>chroot_list_file=/etc/vsftpd/chroot_list - 行番号 128: –>>
local_root=www/html
- 行番号 12:
- $
sudo setsebool -P ftp_home_dir on
local_enable=YESをアンコメントしている場合は, on にするようにと, vsftpd.conf に書いてあった。 - $
sudo vi /etc/vsftpd/chroot_list
chroot_list に ‘admin’ を追加した。 - “chroot_~” をアンコメントして,一般ユーザとして, FTP 経由でアクセスしたら, 500 OOPS: vsftpd: refusing to run with writable root inside chroot() が出た。
で,allow_writeable_chroot=YESを vsftpd.conf に追加。この情報は, 500 OOPS: vsftpd: refusing to run with writable root inside chroot() Login failed on debian (魚拓です)からもらった。
行番号 104: –>>allow_writeable_chroot=YES - $
sudo systemctl start vsftpd.service
$sudo systemctl enable vsftpd.service
$sudo firewall-cmd --permanent --zone=public --add-service=ftp
$sudo firewall-cmd --reload
「初めての VPS-#3 (CentOS7 上に LAMP を構築)。」への2件の返信
おはようございます。
すばらしい!!
また綺麗にまとめてらっしゃいます。
それと雪がふるようにしたんですね。
vsftpdまでよんできがつきました・・・。
後はハヤブサの成功を祈るのみです。
くりくりさん,こんばんは。
> 後はハヤブサの成功を祈るのみです。
無事,切り離しまでは,成功しましたね。後は,長い長い旅路をがんばってもらわなくてはいけません。一般受けはしないかもしれませんが,何事もなく,無事に探査を終えて帰ってきてほしいです。 2020 年に帰ってくるころには,どんな情勢になっているでしょうか。気にかかります。世界が平和でないと,オーストラリアに帰ってくるはやぶさ 2 の回収もままなりません。
> それと雪がふるようにしたんですね。
はい,今年も降ってますね。昨年,降らせていたときは,まだ,背景が黒だったのでよく見えたのですが,今は,白っぽい画面なので,よく見えませんね。