端末を開き,下記のコマンドで, root としてログインする。
[centos@CentOS ~]$ su –
Password: <<—– root のパスワードを入力
VMware Tools のインストールには,Perlがいるので,インストールされているかを確認する。
[root@CentOS ~]# yum list installed | grep perl
perl.i686 4:5.10.1-129.el6 @anaconda-CentOS-201303020136.i386/6.4 <<—– インストール済み
…………
仮想 CD-ROM デバイスのマウント状態を確認する。
[root@CentOS ~]# mount
…………
/dev/sr0 on /media/VMware Tools type iso9660 (ro,nosuid,nodev, …) <<—– マウント済み
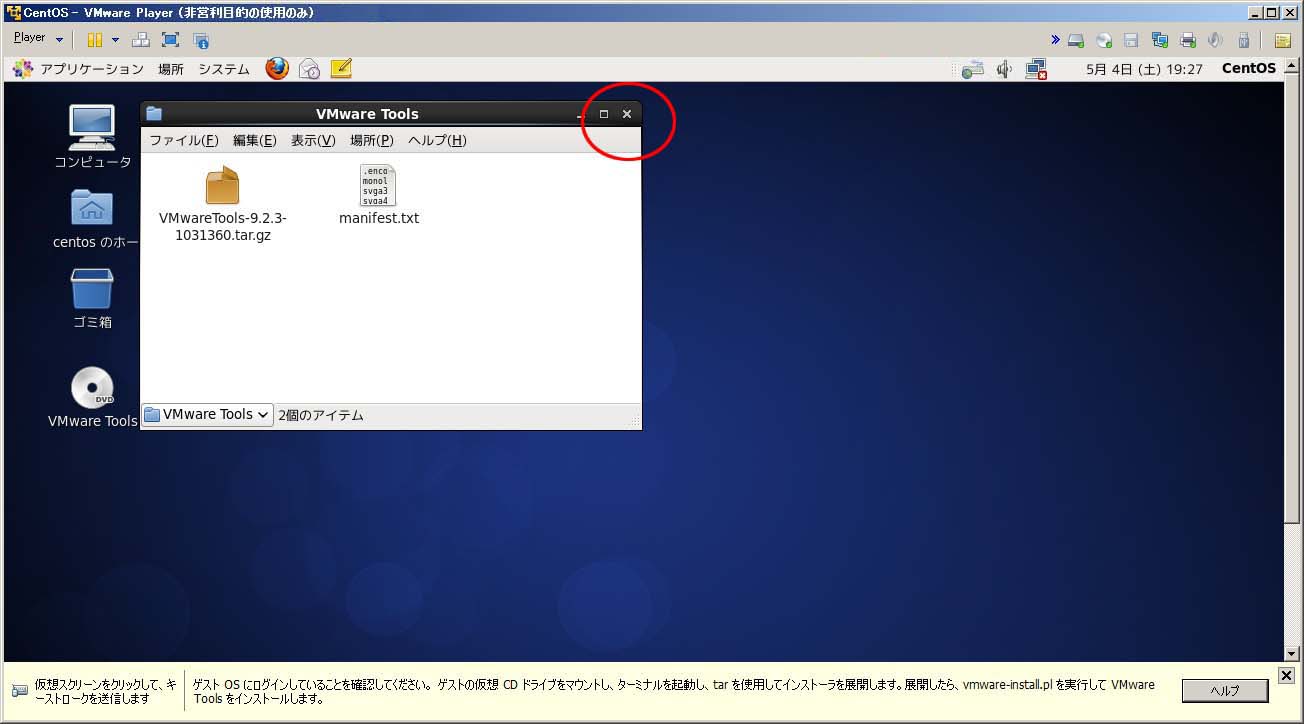
“VMware Tools” ファイルの正確な名前を確認するために,仮想 CD-ROM のリストを表示。
[root@CentOS ~]# ls /media/”VMware Tools”
VMwareTools-9.2.3-1031360.tar.gz manifest.txt
[root@CentOS ~]# cd /tmp <<—– tmp ディレクトリに移動
[root@CentOS tmp]# tar zxpf /media/”VMware Tools”/VMwareTools-9.2.3-1031360.tar.gz
[root@CentOS tmp]# ls
…………
vmware-tools-distrib
…………
[root@CentOS tmp]# ls vmware-tools-distrib
FILES INSTALL bin doc etc installer lib vmware-install.pl
[root@CentOS tmp]# cd vmware-tools-distrib
[root@CentOS vmware-tools-distrib]# ./vmware-install.pl
「以下は,vmware-install.pl からのメッセージ」
Creating a new VMware Tools installer database using the tar4 format.
Installing VMware Tools.
In which directory do you want to install the binary files? [/usr/bin]
What is the directory that contains the init directories (rc0.d/ to rc6.d/)? [/etc/rc.d]
What is the directory that contains the init scripts? [/etc/rc.d/init.d]
In which directory do you want to install the daemon files? [/usr/sbin]
In which directory do you want to install the library files? [/usr/lib/vmware-tools]
The path “/usr/lib/vmware-tools” does not exist currently. This program is going to create it, including needed parent directories. Is this what you want? [yes]
In which directory do you want to install the documentation files? [/usr/share/doc/vmware-tools]
The path “/usr/share/doc/vmware-tools” does not exist currently. This program is going to create it, including needed parent directories. Is this what you want? [yes]
The installation of VMware Tools 9.2.3 build-1031360 for Linux completed successfully. You can decide to remove this software from your system at any time by invoking the following command: “/usr/bin/vmware-uninstall-tools.pl”.
Before running VMware Tools for the first time, you need to configure it by invoking the following command: “/usr/bin/vmware-config-tools.pl”. Do you want this program to invoke the command for you now? [yes]
Initializing…
/usr/bin/xrandr: Failed to get size of gamma for output default
Making sure services for VMware Tools are stopped.
Stopping Thinprint services in the virtual machine:
Stopping Virtual Printing daemon: done
Stopping VMware Tools services in the virtual machine:
Guest operating system daemon: [ OK ]
Unmounting HGFS shares: [ OK ]
Guest filesystem driver: [ OK ]
The VMware FileSystem Sync Driver (vmsync) allows external third-party backup software that is integrated with vSphere to create backups of the virtual machine. Do you wish to enable this feature? [no]
Found a compatible pre-built module for vmci. Installing it…
Found a compatible pre-built module for vsock. Installing it…
The module vmxnet3 has already been installed on this system by another installer or package and will not be modified by this installer. Use the flag
–clobber-kernel-modules=vmxnet3 to override.
The module pvscsi has already been installed on this system by another installer or package and will not be modified by this installer. Use the flag
–clobber-kernel-modules=pvscsi to override.
The module vmmemctl has already been installed on this system by another installer or package and will not be modified by this installer. Use the flag
–clobber-kernel-modules=vmmemctl to override.
The VMware Host-Guest Filesystem allows for shared folders between the host OS and the guest OS in a Fusion or Workstation virtual environment. Do you wish to enable this feature? [yes]
no <<—–ここだけ,デフォルトから変更した。
Found a compatible pre-built module for vmhgfs. Installing it…
Found a compatible pre-built module for vmxnet. Installing it…
The vmblock enables dragging or copying files between host and guest in a Fusion or Workstation virtual environment. Do you wish to enable this feature? [yes]
!!! [EXPERIMENTAL] !!!
VMware automatic kernel modules enables automatic building and installation of VMware kernel modules at boot that are not already present. By selecting yes, you will be enabling this experimental feature. You can always disable this feature by re-running vmware-config-tools.pl.
Would you like to enable VMware automatic kernel modules? [no]
Thinprint provides driver-free printing. Do you wish to enable this feature? [yes]
Disabling timer-based audio scheduling in pulseaudio.
Detected X server version 1.13.0
Distribution provided drivers for Xorg X server are used.
Skipping X configuration because X drivers are not included.
Creating a new initrd boot image for the kernel.
Starting Virtual Printing daemon: done
Checking acpi hot plug [ OK ]
Starting VMware Tools services in the virtual machine:
Switching to guest configuration: [ OK ]
Guest vmxnet fast network device: [ OK ]
VM communication interface: [ OK ]
VM communication interface socket family: [ OK ]
Guest filesystem driver: [ OK ]
Blocking file system: [ OK ]
Guest operating system daemon: [ OK ]
The configuration of VMware Tools 9.2.3 build-1031360 for Linux for this running kernel completed successfully.
You must restart your X session before any mouse or graphics changes take effect.
You can now run VMware Tools by invoking “/usr/bin/vmware-toolbox-cmd” from the command line.
To enable advanced X features (e.g., guest resolution fit, drag and drop, and file and text copy/paste), you will need to do one (or more) of the following:
1. Manually start /usr/bin/vmware-user
2. Log out and log back into your desktop session; and,
3. Restart your X session.
To use the vmxnet driver, restart networking using the following commands:
/etc/init.d/network stop
rmmod pcnet32
rmmod vmxnet
modprobe vmxnet
/etc/init.d/network start
Enjoy,
–the VMware team
「以上,vmware-install.pl からのメッセージ」
[root@CentOS ~]# exit
端末の窓を閉じる。
 (Fig.02)
 (Fig.03)
 (Fig.04)
 (Fig.05)
 (Fig.06)
 (Fig.07)
 (Fig.08)
 (Fig.09)
 (Fig.10)
 (Fig.11)
 (Fig.12)
 (Fig.13)
 (Fig.14)
 (Fig.15)
 (Fig.16)
 (Fig.17)
 (Fig.18)
 (Fig.19)
 (Fig.20)
 (Fig.21)
 (Fig.22)
 (Fig.23)
 (Fig.24)
 (Fig.25)
 (Fig.26)
 (Fig.27)
 (Fig.28)
 (Fig.29)
 (Fig.30)
 (Fig.31)
 (Fig.32)