I have to apologize to you for my server trouble. Last night(actually Aug.9 early morning), my ISP had a maintenance. After that, inbound accesses might have had troubles. I hadn’t noticed until 18:00 because outbound accesses had no trouble. Now, my server is fine.
==================================================================
Tooooooooooooooooooooo muggy!!
Recently, we always have the highest temperature around 36℃ and the humidity around 70% or higher in my town. So, I made neck coolers from tenugui(手ぬぐい) I had. Ha-ha-ha. It is very useful during I get rid of weeds. These days I especially need to get rid of my garden weeds because Obon is just round the corner. This Sunday, I went and cleaned my graveyard. At that time, the neck cooler was very convenient, too. Grrr!
I thought about making handmade neck coolers because my old neck cooler I bought about five years ago was real old and I saw one of my friends put on a neck cooler which has a small pocket for an ice pack. 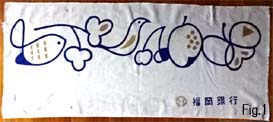 In Japan today, some shops give small ice packs to costumers who buy something like fresh cakes. The ice pack is about 7 by 8 centimeters in size. I have about ten ice packs in my refrigerator. I would be a fool not to take advantage of them.
I have no sewing machine, so I sew it by hand.
Now I’ll tell you how to make a handmade neck cooler from tenugui(手ぬぐい) which is about 33 by 90 centimeters in size. Its shape is a rectangle like the right image. (Fig.1)
 First, crease the tenugui and make sewing marks by an electric iron.
Fold the tenugui in half. Do top side and bottom side neatly together. (Fig.2) Fold the upper lap down in half.
(Fig.3)
 Turn over the tenugui and fold the other lap down. Make the tenugui into accordion fold. (Fig.4)
 Fold the tenugui in half. Do right side and left side neatly together. (Fig.5)
 Now, put an ice pack on the tenugui for checking its width. (Fig.6)
 Fold the upper lap group at the line which was determined by the width of the ice pack + α. (Fig.7)
 Turn over the tenugui.
(Fig.8)
 Fold the other lap group. Do right side and left side neatly together. (Fig.9)
 Second, sewing.
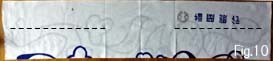
Unfold the tenugui like the image (Fig.10) and sew.
Each dashed line means a stitch.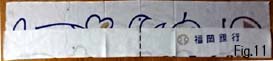 Fold the upper lap down and sew. At the sewing place there three laps. Sew only two upper laps.
(Fig.11) Fold the tenugui in the same way as fig.4.
(Fig.12) Inside out the tenugui.
(Fig.13)
 Shape the tenugui and iron. Then sew the two place.
(Fig.14) Put two ice packs into the pockets of the neck cooler.
(Fig.15)
Now I have five tenugui neck coolers. I wrapped it around my neck like this. Unfortunately, duration of effect is only about an hour.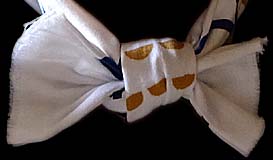
Edit(2017.Aug.10):
Last summer, I made handmade neck coolers. This summer I gave an improvement to them. The improvement is to add one more pocket for an ice pack. I unsewed two lines and sewed again like this. Now my handmade neck coolesr has three pockets for ice packs.