Categories
net radio

Series Net Radio #3: How to use SHOUTcast radio.

同一記事の日本語版
Playing (Server)
Playing (Server)

   Continued from my last post.
   At this post I’ll write ‘How to use SHOUTcast radio’. Of course not about SHOUTcast public radios but about our private radios.
 
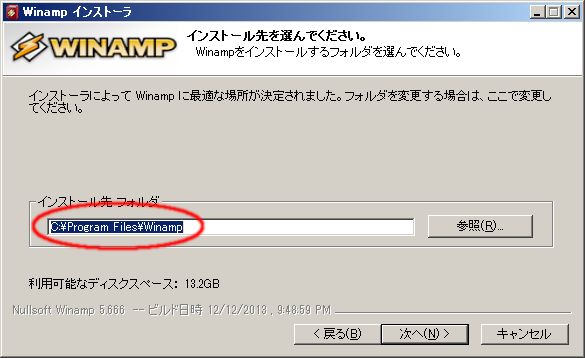
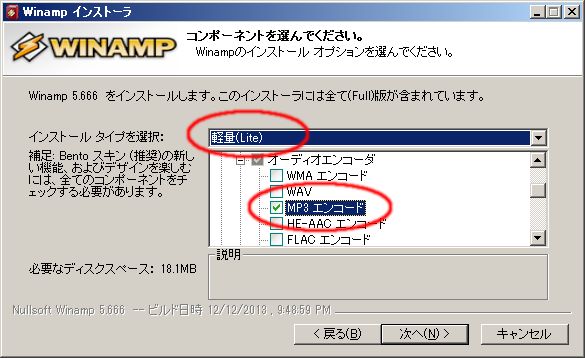
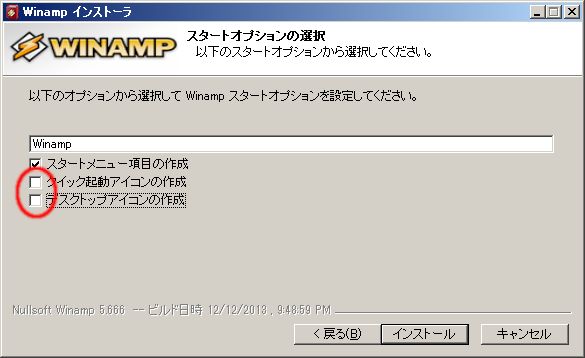
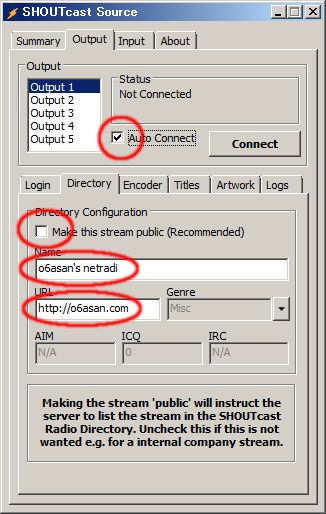
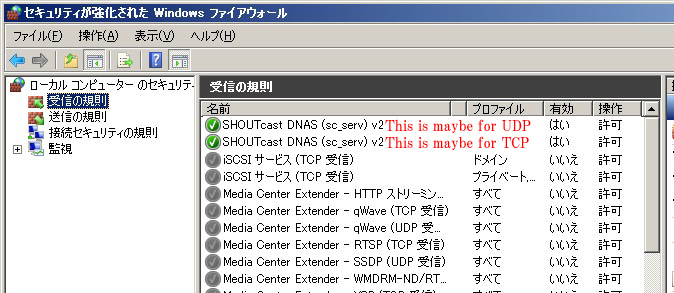
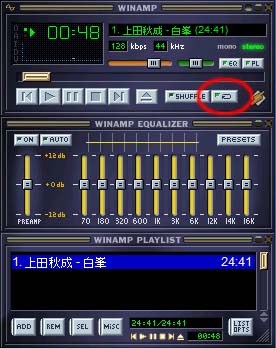
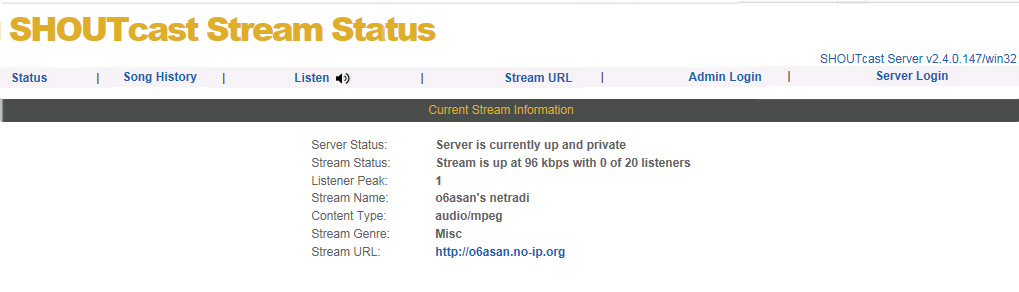
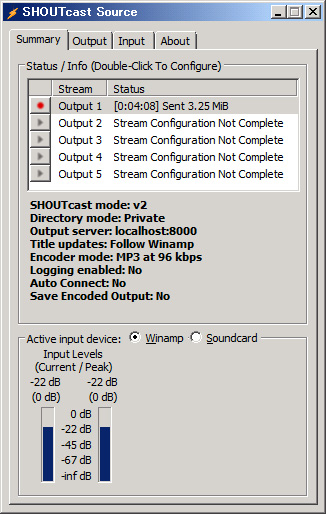
   When you just finished ‘Series Net Radio #2‘, your sever is running and your DSP plug-in is connecting with the server. Now play an audio file on the Winamp like the right figure ‘Playing’. Then confirm the status by the browser with accessing to http://localhost:8000 on the server PC (See fig. Status). If accessing from a PC except the sever PC on your Lan, change ‘localhost’ to ‘server_local_ip’. If accessing from a PC in somewhere on the Internet, change ‘localhost’ to ‘server_global_ip’, of course before that you need a correct setting for accessing your server from the Internet.

Status
Status

Output (Server)
Output (Server)

Input (Server)
Input (Server)
Open URL (Client)
Open URL (Client)

   Let’s try and listen the Net Radio by a player, something like Windows Media Player, Winamp and so on.
 
   You can listen to it on the server PC itself, however, on it you hear both source sounds and client sounds. So, it is better that you try and listen this work on another PC.
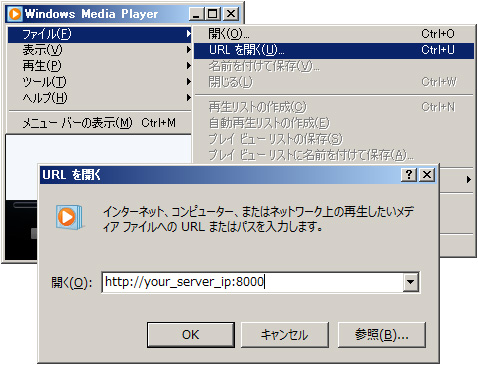
   Run Windows Media Player and hit [Alt]key. Then ‘File’ >> ‘Open URL…’. You reach the left figure ‘Open URL’, input URL and click ‘OK’. Can you hear the radio?
 
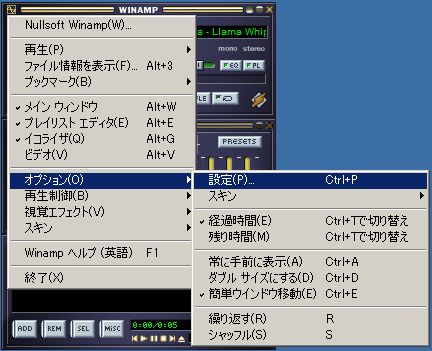
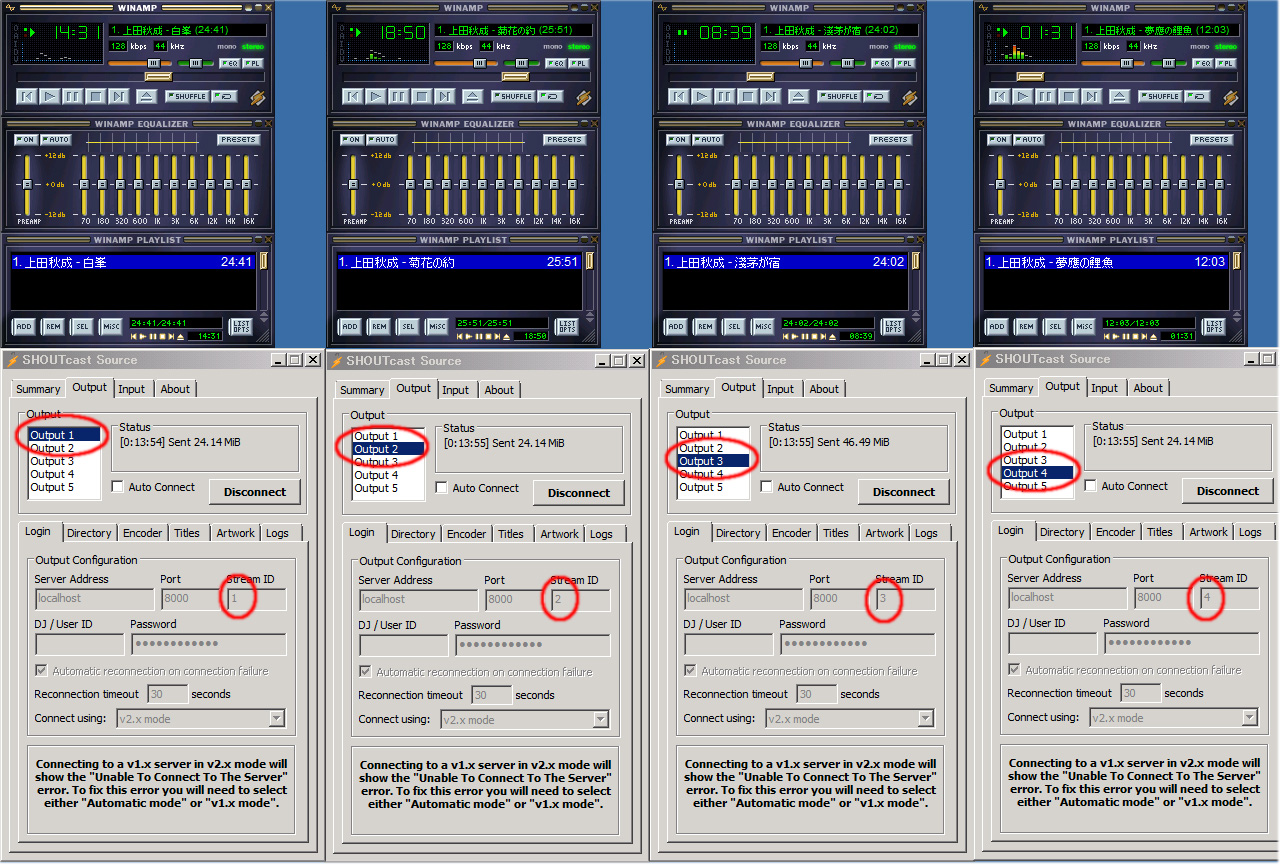
   See the figure ‘Playing’ that has a red circle. The icon in the circle is for ‘Loop’. Winamp automatically repeats the audio file when ‘Loop’ sets to ‘ON’. If you set multiple audio files to the Winamp, it plays all files continuously. If you set four files and ‘Loop’ to ‘ON’, the Winamp repeats endlessly, like this: 1 → 2 → 3 → 4 → 1 → 2 → 3 → 4 → 1 → …
 

Multi-Instances (Server)

   My current radio you can listen to on browsers. I embed players in my Net Radio page (It doesn’t exist anymore – 2016.Jun.1) I use HTML5 now, so the codes are very simple. Like this:
   <audio controls="controls">
      <source src="http://your_sever_ip:8000">
   <!-- fallback -->
      Your browser cannot handle HTML5.
   </audio>
 
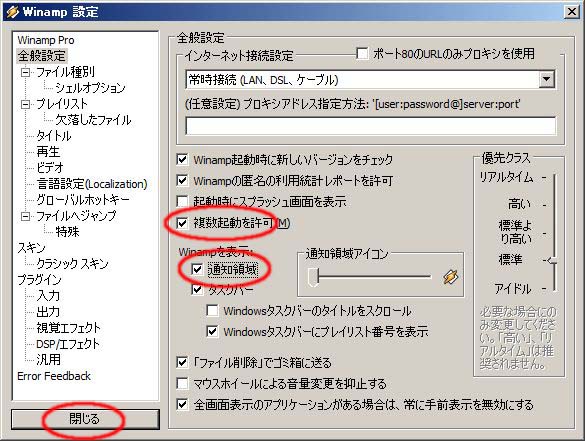
   See my Net Radio page (It doesn’t exist anymore – 2016.Jun.1), and you’ll notice that multiple channels exist there. I am running four channels and each channel is putting each reading on the air. When the current server was configured, ‘Allow multiple instances’ was checked. So, you can set at least five streams with DSP plug-in easily. See the right figure ‘Multi-Instances’. Output1 ~ Output4 have the same settings except their Stream_ID.
 
   For listening each stream, you can use next URL formats.
   http://your_sever_ip:8000/listen.pls?sid=Stream_ID
   http://your_sever_ip:8000/listen.m3u?sid=Stream_ID
   http://your_sever_ip:8000/listen.xspf?sid=Stream_ID
   http://your_sever_ip:8000/stream/Stream_ID/
 
   But the format http://your_sever_ip:8000/stream/Stream_ID/ is better when you embed it in browsers. Because other than that show errors in environments even if the browsers can handle HTML5.
 
   That’s it for this topic. Very long!! I got tired (^_^;).

Categories
net radio

Series Net Radio #2: How to install Winamp and SHOUTcast DSP.

同一記事の日本語版

Continued from my last post.
My Net Radio station runs with the following formation on Windows(x86), so I install Winamp and SHOUTcast Source DSP now.

Winamp + DSP
(Source)
<> DNAS [sc_serv]
(Server)
<> Something like Players
(Client)

I’d forgotten to write it. DNAS is short for Distributed Network Audio Server and DSP is short for Digital Signal Processing.

||How to install Winamp|| 1. Download 2. Install 5. Setting
||How to install DSP|| 3. Download 4. Install 5. Setting
  1. Winamp download
    Winamp download

    Download the latest version of Winamp. Don’t click ‘Download latest version’ but ‘Direct Download’.

  2. Installing WinampSelect the language for the install navigation (See fig. Winamp install#1).
    Install Winamp to the default location (See fig. Winamp install#4).

    Select the install type ‘Lite’ because of this Winamp used for SHOTcast source only and check ‘MP3 encoding’ which exists at Audio Encoders in Multimedia Engine (See fig. Winamp install#5). You can select the language for Winamp at this step if you need.

    At Winamp install#6 I uncheck two options but it’s OK if you leave the default.
    After Winamp install#8 Winamp runs. Close it.

    ‘Control Panel’ >> ‘Administrative Tools’ >> ‘Windows Firewall with Advanced Security’
    Select ‘Inbound Rules’.

    You see two rules about Winamp that has a private profile. One is for UDP and another is for TCP. I think they’re not necessary for SHOTcast source features so I delete them (See fig. Winamp install#9).

    Winamp install#1
    Winamp install#1

    Winamp install#2
    Winamp install#2

    Winamp install#3
    Winamp install#3

    Winamp install#4
    Winamp install#4

    Winamp install#5
    Winamp install#5

    Winamp install#6
    Winamp install#6

    Winamp install#7
    Winamp install#7

    Winamp install#8
    Winamp install#8

    Winamp install#9
    Winamp install#9
  3. Download SHOUTcast Source DSP (shoutcast-dsp-x-x-x-windows.exe) from the same location about SHOUTcast DNAS. Even if you want free version of SHOUTcast DNAS software, to download the files from the official site you need a personal data registration now, like this. (2016.Jun.1)
  4. SHOUTcast Source DSP install.Installing SHOUTcast Source DSP by the default. If you change the Winamp install folder, you have to install your SHOUTcast Source DSP into it.

    DSP install#1
    DSP install#1

    DSP install#2
    DSP install#2

    DSP install#3
    DSP install#3

    DSP install#4
    DSP install#4

    DSP install#5
    DSP install#5
  5. After ‘DSP install#5’ both Winamp and DSP run.Settings about Winamp itself, ‘Options’ >> ‘Preferences’ (See fig. DSP setting#1).
    In General Preferences check ‘Allow multiple instances’ and ‘Notification area’. When ‘Allow multiple instances’ is checked, you can broadcast at least five streams by SHOUTcast Source DSP (See fig. DSP setting#2).
    And then close ‘Preferences’.

    About SHOUTcast Source, set the password (= password in your sc_serv.conf) (See fig. DSP setting#3). Uncheck ‘Make this stream public’ because the current server is a private one. Change ‘Name’ and ‘URL’ to your own. Then check ‘Auto Connect’ or click ‘Connect’.

    Now the preparation for the broadcast is completed. You make the Winamp play an audio, and the broadcasting will start.

    DSP setting#1
    DSP setting#1

    DSP setting#2
    DSP setting#2

    DSP setting#3
    DSP setting#3

    DSP setting#4
    DSP setting#4

If you want to use the radio within your LAN only, you can already do it. But if you want to give your service to someone on the Internet and use a router or something, you’ll need to set them up. About it see your router manual or ask your network admin.

The next post I will write how to use the SHOUTcast radio.

Categories
net radio

Series Net Radio #1: How to create a SHOUTcast server.

同一記事の日本語版

   It was on 2011 October 13 that I wrote the first article about Net Radio. One of my Japanese blog visitors consulted with me as to begin a net radio station, so I learned and created my private net radio station(It doesn’t exist anymore – 2016.Jun.1) though I didn’t know anything about it at the time. The station was only for me and the situation is the same still now. Anyway I have a net radio station and am using SHOUTcast DNAS for it.
   Last year AOL decided to sell SHOUTcast and Winamp and Radionomy bought SHOUTcast on 2014 January 14. Hence, I will write a new article about SHOUTcast private radio. Shall I start?

||How to create a SHOUTcast server||
1. Download
4. Install as a Service
2. Install
5. Firewall
3. Setup
6. Login test
  1. Download SHOUTcast DNAS from here. Even if you want free version of SHOUTcast DNAS software, to download the files from the official site you need a personal data registration now, like this. (2016.Jun.1) Click ‘DOWNLOAD’ then you can see the links for download.

    SHOUTcast download#1
    SHOUTcast download#1

    SHOUTcast download#2
    SHOUTcast download#2

    About SHOUTcast DNAS, you have to download a correct version. In my case, I downloaded sc_serv2_win32_xx_xx_xxxx.exe.

  2. Install sc_serv2_win32_xx_xx_xxxx.exe
     
    If you install DNAS to the default folder, you have the message of ‘SHOUTcast install#4’ image. In most cases you’d better click ‘No’ and change the install folder from the default, for example D:SHOUTcast.
    When you click ‘Finish’, SHOUTcast shows you ‘Readme_DNAS_Server.html’ by your browser. So, read ‘Getting Started’ first.

    SHOUTcast DNAS install#1
    SHOUTcast install#1

    SHOUTcast install#2
    SHOUTcast install#2

    SHOUTcast install#3
    SHOUTcast install#3

    SHOUTcast install#4
    SHOUTcast install#4

    SHOUTcast install#5
    SHOUTcast install#5

    SHOUTcast install#6
    SHOUTcast install#6
  3. Setup SHOUTcast DNAS Server.
     
    You have a Windows Security Alert about SHOUTcast DNAS, then allow access about public networks only (See fig. SHOUTcast setup#1). I don’t have exact knowledge about Public, Private and Domain settings, but I feel better that to allow access is only for Public as I read Understanding Firewall Profiles.
     
    Run cmd.exe as Administrator and move to SHOUTcast folder which includes ‘setup.bat’.
    Run setup.bat on cmd.
    > setup.bat
     
    You have a setup page on your browser like the followings (See figs. SHOUTcast setup#2 ~ #4):

    SHOUTcast DNAS setup#1
    SHOUTcast DNAS setup#1

    SHOUTcast DNAS setup#2
    SHOUTcast DNAS setup#2

    SHOUTcast DNAS setup#3
    SHOUTcast DNAS setup#3

    SHOUTcast DNAS setup#4
    SHOUTcast DNAS setup#4

    See the above images and do the settings.

    Close your browser.
    Now you have a conf file named ‘sc_serv.conf’ in the SHOUTcast folder. This is the default conf for the server.

    The text of sc_serv.conf:
    adminpassword=(your existing adminpassword)
    autoauthhash=0
    Because the current server is private.
    maxuser=20 If the default value, it’s maybe OK.
    password=(your existing password)
    publicserver=never
    streamid_1=1

     
    Here are the passwords. The passwords themselves are clear text. For security purposes, I STRONGLY recommend that you don’t use passwords that are used to access critical system components or other sensitive information. Make these as random as possible, with a combination of letters, numbers and symbols.

  4. Install as a Service
    Service setting
    Service setting

     
    On the cmd:
    > sc_serv.exe install sc_serv
    Close the cmd.exe.
     
    ‘Control Panel’ >> ‘Administrative Tools’ >> ‘Services’
    Select sc_serv and change its startup type value to ‘Automatic’. Click ‘Start’ and ‘OK’.
     
    If you need more information, see ‘DNAS_Server.html#Install_as_a_Service’ in the SHOUTcastdocs.

  5. Setting firewall for SHOUTcast DNAS.
     
    ‘Control Panel’ >> ‘Administrative Tools’ >> ‘Windows Firewall with Advanced Security’
    Select ‘Inbound Rules’.
     
    You see two rules about SHOUTcast DNAS (sc_serv) v2 that has public profile, if your step was normally done at ‘SHOUTcast setup#1’. One is for UDP and another is for TCP. You don’t need to open UDP ports, so delete the UDP rule. (See figs. Firewall settings#1 & #2)
     
    Change the following values about TCP rule (See figs. Specific Ports 8000 ~ Advanced, Block edge traversal):

    Firewall settings#1
    Firewall settings#1

    Firewall settings#2
    Firewall settings#2

    Specific Ports 8000
    Specific Ports 8000

    Scope, These IP addresses:
    Scope, These IP addresses:

    Add the server local address.
    Add the server local address.

    Advanced,  Block edge traversal
    Advanced, Block edge traversal

    Click ‘OK’.

  6. Login test.
     
    You can log in the server by your adminpassword.
    Access http://your_server_ip:8000 (the default: http://localhost:8000), then you’ll have ‘SHOUTcast Server Summary’ by the browser.

    Login test#1
    Login test#1

    Login test#2
    Login test#2

    Login test#3
    Login test#3

   To create a SHOUTcast server is complete!! The next post I will write the installations about Winamp and SHOUTcast DSP.