Categories
Vulnerability

ShellShock, shock shock shock!

同一記事の日本語版
Update information      Edit(Sep.30)    Edit2(Oct.6)

   Whew!!
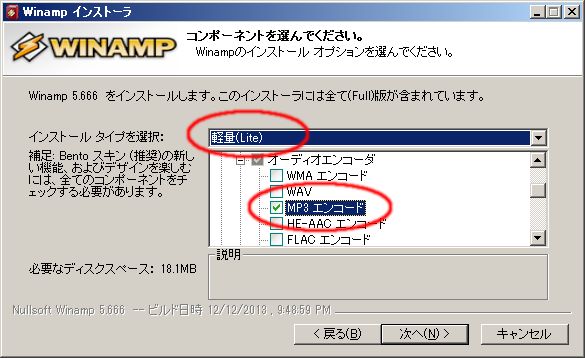
   Have you coped with the threat from ShellShock, yet? My server is on Windows OS. Hence I think the vulnerability gives no effect to mine. But it’s a very serious one. NVD gave the impact score 10 to this. I have a CentOS 6.5 on my VMware, so I updated its bash to bash-4.1.2-15.el6_5.2.i686.

   If you still have the following messages after updating and doing env x='() { :;}; echo
vulnerable' bash -c "echo this is a test"
, your bash need more updating.
bash: warning: x: ignoring function definition attempt
bash: error importing function definition for 'x'
this is a test

   I got the information form Masanari Iida’s comment on Red Hat Customer Portal.

   Several links which I am curious about, actually tons of articles about it on the Internet:

   By the way, I had the ShellShock attacks six times and blocked their IPs until yesterday, and today two more from other IPs until now on the Apache error log. I found that all of them my Apache returned HTTP Error Codes to.

Edit(Sep.30):
   On “Bash bug: apply Florian’s patch now” he said “I very strongly recommend manually deploying Florian’s patch unless your distro is already shipping it.” and how to check the patch applied or not.

   When you do foo='() { echo not patched; }' bash -c foo within the shell, the patch is already applied if you have “command not found”. If you have “not patched”, your bash is still vulnerable.

   On its comment vdp wrote “These ‘toughen the feature’ patches still feel quite scary.” and a suggestion. I agree with him.

Edit2Oct.6):
   Today, I’ve found this (Japanese).

   Woooo!
   It says that it’s not enough to check the bash by the code foo='() { echo not patched; }'
bash -c foo
. Nonetheless, they have less critical than CVE-2014-6271 or CVE-2014-7169. But still dangerous.

Categories
Windows

Updating to PHP5.6.1.

同一記事の日本語版

   They released PHP5.6.1 Windows version on Sep-25 06:28:30UTC. Recently, Windows versions release earlier than other versions. So, I updated my PHP from 5.6.0 to 5.6.1 on my Web server (Windows7HP+SP1(x86)).

   There is no difference between the two php.ini-production files except a misspelling correction. So I replaced all files and copied my php.ini file to the folder. Then I restarted the httpd.exe.

   About OPcache bug is still remaining. But the above is my ordinary steps. So I thought “That’s it.”

   Buuuuuuuuuuuuuuuuuut I had very troubles at this time. First I found the warning “PHP Startup: in Unknown on line 0” on the Apache error log. Only this. It had no module name or anything else. But it was just a warning, i.e. that was a very little problem. And when I checked up the PHP information about PHP Version 5.6.1, I found out the php_curl.dll was not loaded. Boo-hoo-hoo!

   Finally I found out the solution after hard work for all day.
   I added “x:PHP install directory” to PATH Environment Variable. I think, usually, most of PHP users added it when they first installed PHP. But I didn’t and I had no problem until today. I guessed this is the new requirement of PHP5.6.1 at the first time. However, after reading “the curl extension doesn’t load using apache” and seeing its date, I bet that this trouble maybe depends on Windows Security updates.

   Anyway, PHP5.6.1 is working well on the server.

   If you need more information for the configuration, see the post “Migrating from PHP 5.5.16 to PHP 5.6.0 on Windows“.

Categories
net radio

Series Net Radio #3: How to use SHOUTcast radio.

同一記事の日本語版
Playing (Server)
Playing (Server)

   Continued from my last post.
   At this post I’ll write ‘How to use SHOUTcast radio’. Of course not about SHOUTcast public radios but about our private radios.
 
   When you just finished ‘Series Net Radio #2‘, your sever is running and your DSP plug-in is connecting with the server. Now play an audio file on the Winamp like the right figure ‘Playing’. Then confirm the status by the browser with accessing to http://localhost:8000 on the server PC (See fig. Status). If accessing from a PC except the sever PC on your Lan, change ‘localhost’ to ‘server_local_ip’. If accessing from a PC in somewhere on the Internet, change ‘localhost’ to ‘server_global_ip’, of course before that you need a correct setting for accessing your server from the Internet.

Status
Status

Output (Server)
Output (Server)

Input (Server)
Input (Server)
Open URL (Client)
Open URL (Client)

   Let’s try and listen the Net Radio by a player, something like Windows Media Player, Winamp and so on.
 
   You can listen to it on the server PC itself, however, on it you hear both source sounds and client sounds. So, it is better that you try and listen this work on another PC.
   Run Windows Media Player and hit [Alt]key. Then ‘File’ >> ‘Open URL…’. You reach the left figure ‘Open URL’, input URL and click ‘OK’. Can you hear the radio?
 
   See the figure ‘Playing’ that has a red circle. The icon in the circle is for ‘Loop’. Winamp automatically repeats the audio file when ‘Loop’ sets to ‘ON’. If you set multiple audio files to the Winamp, it plays all files continuously. If you set four files and ‘Loop’ to ‘ON’, the Winamp repeats endlessly, like this: 1 → 2 → 3 → 4 → 1 → 2 → 3 → 4 → 1 → …
 

Multi-Instances (Server)

   My current radio you can listen to on browsers. I embed players in my Net Radio page (It doesn’t exist anymore – 2016.Jun.1) I use HTML5 now, so the codes are very simple. Like this:
   <audio controls="controls">
      <source src="http://your_sever_ip:8000">
   <!-- fallback -->
      Your browser cannot handle HTML5.
   </audio>
 
   See my Net Radio page (It doesn’t exist anymore – 2016.Jun.1), and you’ll notice that multiple channels exist there. I am running four channels and each channel is putting each reading on the air. When the current server was configured, ‘Allow multiple instances’ was checked. So, you can set at least five streams with DSP plug-in easily. See the right figure ‘Multi-Instances’. Output1 ~ Output4 have the same settings except their Stream_ID.
 
   For listening each stream, you can use next URL formats.
   http://your_sever_ip:8000/listen.pls?sid=Stream_ID
   http://your_sever_ip:8000/listen.m3u?sid=Stream_ID
   http://your_sever_ip:8000/listen.xspf?sid=Stream_ID
   http://your_sever_ip:8000/stream/Stream_ID/
 
   But the format http://your_sever_ip:8000/stream/Stream_ID/ is better when you embed it in browsers. Because other than that show errors in environments even if the browsers can handle HTML5.
 
   That’s it for this topic. Very long!! I got tired (^_^;).

Categories
net radio

Series Net Radio #2: How to install Winamp and SHOUTcast DSP.

同一記事の日本語版

Continued from my last post.
My Net Radio station runs with the following formation on Windows(x86), so I install Winamp and SHOUTcast Source DSP now.

Winamp + DSP
(Source)
<> DNAS [sc_serv]
(Server)
<> Something like Players
(Client)

I’d forgotten to write it. DNAS is short for Distributed Network Audio Server and DSP is short for Digital Signal Processing.

||How to install Winamp|| 1. Download 2. Install 5. Setting
||How to install DSP|| 3. Download 4. Install 5. Setting
  1. Winamp download
    Winamp download

    Download the latest version of Winamp. Don’t click ‘Download latest version’ but ‘Direct Download’.

  2. Installing WinampSelect the language for the install navigation (See fig. Winamp install#1).
    Install Winamp to the default location (See fig. Winamp install#4).

    Select the install type ‘Lite’ because of this Winamp used for SHOTcast source only and check ‘MP3 encoding’ which exists at Audio Encoders in Multimedia Engine (See fig. Winamp install#5). You can select the language for Winamp at this step if you need.

    At Winamp install#6 I uncheck two options but it’s OK if you leave the default.
    After Winamp install#8 Winamp runs. Close it.

    ‘Control Panel’ >> ‘Administrative Tools’ >> ‘Windows Firewall with Advanced Security’
    Select ‘Inbound Rules’.

    You see two rules about Winamp that has a private profile. One is for UDP and another is for TCP. I think they’re not necessary for SHOTcast source features so I delete them (See fig. Winamp install#9).

    Winamp install#1
    Winamp install#1

    Winamp install#2
    Winamp install#2

    Winamp install#3
    Winamp install#3

    Winamp install#4
    Winamp install#4

    Winamp install#5
    Winamp install#5

    Winamp install#6
    Winamp install#6

    Winamp install#7
    Winamp install#7

    Winamp install#8
    Winamp install#8

    Winamp install#9
    Winamp install#9
  3. Download SHOUTcast Source DSP (shoutcast-dsp-x-x-x-windows.exe) from the same location about SHOUTcast DNAS. Even if you want free version of SHOUTcast DNAS software, to download the files from the official site you need a personal data registration now, like this. (2016.Jun.1)
  4. SHOUTcast Source DSP install.Installing SHOUTcast Source DSP by the default. If you change the Winamp install folder, you have to install your SHOUTcast Source DSP into it.

    DSP install#1
    DSP install#1

    DSP install#2
    DSP install#2

    DSP install#3
    DSP install#3

    DSP install#4
    DSP install#4

    DSP install#5
    DSP install#5
  5. After ‘DSP install#5’ both Winamp and DSP run.Settings about Winamp itself, ‘Options’ >> ‘Preferences’ (See fig. DSP setting#1).
    In General Preferences check ‘Allow multiple instances’ and ‘Notification area’. When ‘Allow multiple instances’ is checked, you can broadcast at least five streams by SHOUTcast Source DSP (See fig. DSP setting#2).
    And then close ‘Preferences’.

    About SHOUTcast Source, set the password (= password in your sc_serv.conf) (See fig. DSP setting#3). Uncheck ‘Make this stream public’ because the current server is a private one. Change ‘Name’ and ‘URL’ to your own. Then check ‘Auto Connect’ or click ‘Connect’.

    Now the preparation for the broadcast is completed. You make the Winamp play an audio, and the broadcasting will start.

    DSP setting#1
    DSP setting#1

    DSP setting#2
    DSP setting#2

    DSP setting#3
    DSP setting#3

    DSP setting#4
    DSP setting#4

If you want to use the radio within your LAN only, you can already do it. But if you want to give your service to someone on the Internet and use a router or something, you’ll need to set them up. About it see your router manual or ask your network admin.

The next post I will write how to use the SHOUTcast radio.

Categories
net radio

Series Net Radio #1: How to create a SHOUTcast server.

同一記事の日本語版

   It was on 2011 October 13 that I wrote the first article about Net Radio. One of my Japanese blog visitors consulted with me as to begin a net radio station, so I learned and created my private net radio station(It doesn’t exist anymore – 2016.Jun.1) though I didn’t know anything about it at the time. The station was only for me and the situation is the same still now. Anyway I have a net radio station and am using SHOUTcast DNAS for it.
   Last year AOL decided to sell SHOUTcast and Winamp and Radionomy bought SHOUTcast on 2014 January 14. Hence, I will write a new article about SHOUTcast private radio. Shall I start?

||How to create a SHOUTcast server||
1. Download
4. Install as a Service
2. Install
5. Firewall
3. Setup
6. Login test
  1. Download SHOUTcast DNAS from here. Even if you want free version of SHOUTcast DNAS software, to download the files from the official site you need a personal data registration now, like this. (2016.Jun.1) Click ‘DOWNLOAD’ then you can see the links for download.

    SHOUTcast download#1
    SHOUTcast download#1

    SHOUTcast download#2
    SHOUTcast download#2

    About SHOUTcast DNAS, you have to download a correct version. In my case, I downloaded sc_serv2_win32_xx_xx_xxxx.exe.

  2. Install sc_serv2_win32_xx_xx_xxxx.exe
     
    If you install DNAS to the default folder, you have the message of ‘SHOUTcast install#4’ image. In most cases you’d better click ‘No’ and change the install folder from the default, for example D:SHOUTcast.
    When you click ‘Finish’, SHOUTcast shows you ‘Readme_DNAS_Server.html’ by your browser. So, read ‘Getting Started’ first.

    SHOUTcast DNAS install#1
    SHOUTcast install#1

    SHOUTcast install#2
    SHOUTcast install#2

    SHOUTcast install#3
    SHOUTcast install#3

    SHOUTcast install#4
    SHOUTcast install#4

    SHOUTcast install#5
    SHOUTcast install#5

    SHOUTcast install#6
    SHOUTcast install#6
  3. Setup SHOUTcast DNAS Server.
     
    You have a Windows Security Alert about SHOUTcast DNAS, then allow access about public networks only (See fig. SHOUTcast setup#1). I don’t have exact knowledge about Public, Private and Domain settings, but I feel better that to allow access is only for Public as I read Understanding Firewall Profiles.
     
    Run cmd.exe as Administrator and move to SHOUTcast folder which includes ‘setup.bat’.
    Run setup.bat on cmd.
    > setup.bat
     
    You have a setup page on your browser like the followings (See figs. SHOUTcast setup#2 ~ #4):

    SHOUTcast DNAS setup#1
    SHOUTcast DNAS setup#1

    SHOUTcast DNAS setup#2
    SHOUTcast DNAS setup#2

    SHOUTcast DNAS setup#3
    SHOUTcast DNAS setup#3

    SHOUTcast DNAS setup#4
    SHOUTcast DNAS setup#4

    See the above images and do the settings.

    Close your browser.
    Now you have a conf file named ‘sc_serv.conf’ in the SHOUTcast folder. This is the default conf for the server.

    The text of sc_serv.conf:
    adminpassword=(your existing adminpassword)
    autoauthhash=0
    Because the current server is private.
    maxuser=20 If the default value, it’s maybe OK.
    password=(your existing password)
    publicserver=never
    streamid_1=1

     
    Here are the passwords. The passwords themselves are clear text. For security purposes, I STRONGLY recommend that you don’t use passwords that are used to access critical system components or other sensitive information. Make these as random as possible, with a combination of letters, numbers and symbols.

  4. Install as a Service
    Service setting
    Service setting

     
    On the cmd:
    > sc_serv.exe install sc_serv
    Close the cmd.exe.
     
    ‘Control Panel’ >> ‘Administrative Tools’ >> ‘Services’
    Select sc_serv and change its startup type value to ‘Automatic’. Click ‘Start’ and ‘OK’.
     
    If you need more information, see ‘DNAS_Server.html#Install_as_a_Service’ in the SHOUTcastdocs.

  5. Setting firewall for SHOUTcast DNAS.
     
    ‘Control Panel’ >> ‘Administrative Tools’ >> ‘Windows Firewall with Advanced Security’
    Select ‘Inbound Rules’.
     
    You see two rules about SHOUTcast DNAS (sc_serv) v2 that has public profile, if your step was normally done at ‘SHOUTcast setup#1’. One is for UDP and another is for TCP. You don’t need to open UDP ports, so delete the UDP rule. (See figs. Firewall settings#1 & #2)
     
    Change the following values about TCP rule (See figs. Specific Ports 8000 ~ Advanced, Block edge traversal):

    Firewall settings#1
    Firewall settings#1

    Firewall settings#2
    Firewall settings#2

    Specific Ports 8000
    Specific Ports 8000

    Scope, These IP addresses:
    Scope, These IP addresses:

    Add the server local address.
    Add the server local address.

    Advanced,  Block edge traversal
    Advanced, Block edge traversal

    Click ‘OK’.

  6. Login test.
     
    You can log in the server by your adminpassword.
    Access http://your_server_ip:8000 (the default: http://localhost:8000), then you’ll have ‘SHOUTcast Server Summary’ by the browser.

    Login test#1
    Login test#1

    Login test#2
    Login test#2

    Login test#3
    Login test#3

   To create a SHOUTcast server is complete!! The next post I will write the installations about Winamp and SHOUTcast DSP.

Categories
Uncategorized

The Meiwa Denki (明和電機) is always cool!

   Hi guys! Do you know Meiwa Denki (明和電機)? That is the Meiwa Denki whose performances I love. Their performances you can see on YOUTUBE and here is the video that BBC introduces them.

   Mr.Knocky, I rolled on the floor laughing for the first time in several months. 土佐さん is always a genius, don’t you think so? (^_~)

Categories
everyday life

Tonight is “Otsukimi”, but cloudy.

同一記事の日本語版

   Tonight is “Otsukimi“. Yesterday, I had very clear moon, but cloudy tonight (around 21:00).

The moon from my garden.

Full Moon
Full Moon

Rabbit
Rabbit

   We have a folklore that says a rabbit lives on the moon and it pounds mochi. A song for you about rabbits and the moon. I apologize for the noise in advance. After upgrading to Windows 8.1, I cannot use a genuine sound driver for NJ2100. The noise maybe depends on it.

  • うさぎ (Rabbit)
    Usaki, usaki, nani mite haneru.
    うさぎ,うさぎ,なに見てはねる。
    Jūgoya otsuki sama, mite haneru.
    十五夜お月さま,見てはねる。

   Now, I can see beautiful Full Moon. But, almost Sep 9.

Categories
WordPress

WordPress 4.0 named “Benny” is available but waiting Japanese version.

同一記事の日本語版
Update information      Edit    Edit2(Sep.6)

   WordPress 4.0 named “Benny” is available but waiting Japanese version. How about you, guys?

Edit:
   I had a comment from くりくりさん on the Japanese blog. He wrote “We can select the WordPress language for its installation.” Is this only for at the new installation? I didn’t see about languages at its upgrade though I already have WordPress 4.0 on my test site. On my production sites I run a multisite type, so I am waiting a Japanese version 4.0 because of unease for upgrading. I can see a new ja.mo in the language folder on the test site. So it might be no problem.

   But the production sites default language is English. To upgrade or not to be: that is the question.

Edit2(Sep.6):
   I upgraded to WordPress 4.0-ja at 02:57. I read WordPress 4.0 における言語関連実装の変更とその注意点. So, I deleted the line “define(‘WPLANG’, ‘ja’);” from my old wp-config.php. I deactivated the plugin WP Multibyte Patch on my WordPress Network and re-activated it for the two Japanese child sites.

   I strongly tell myself to remember the followings the next time.

  1. To add two lines to class-http.php.
  2. To add my CA data to ca-bundle.crt.
Categories
WordPress

WordPress not auto saving all articles on my main site.

同一記事の日本語版
Update information      Edit(Sep.6)

   Recently the autosave feature wasn’t working well on o6asan.com though I cannot recall from when. o6asan’s soliloquy and o6asan’s soliloquy-part2 have no problem.

   Apart from this, I found a lot of “WordPress database error Duplicate entry ‘0’ for key ‘PRIMARY’ for query INSERT INTO `WordPress DB table name` ~” on the Apache error log when I checked the errors about php_opcache.dll on August 29.

   Yesterday, I suddenly remembered the errors on the Apache log, and began to get the solution. I saw a lot of sentences related to Notes when I looked into the log again. At the time, I first recognized this errors and autosave feature had a strong relationship. Besides, the errors began on August 23. I must have done something wrong at updating MariaDB. (-_-;)

   I saw what table names the log included, then found them out, i.e. `wp_postmeta`, `wp_posts`, `wp_redirection_logs`, `wp_sitemeta`. I logged in phpMyAdmin and compared wp_postmeta structure with wp_2_postmeta one. Because wp_2_postmeta has no problem. Finally I noticed wp_postmeta had no AUTO_INCREMENT in meta_id’s extra field. I also looked the rests had the same problem.

   First I backed all data up then tried and fixed them.

  1. Select wp_postmeta table.
  2. Select ‘Structure’ from Menu.
  3. Select ‘Change’ from Action of meta_id.
  4. Check ‘A_I’ box on and save.

   If you use CUI, I think you can use the following.
ALTER TABLE `your WP DB name`.`wp_postmeta` CHANGE `meta_id` `meta_id`
BIGINT(20) UNSIGNED NOT NULL AUTO_INCREMENT;

   I did this for `wp_postmeta` and `wp_posts` without difficulty. But for `wp_redirection_logs` and `wp_sitemeta`, I had the following error.
#1062: ALTER TABLE causes auto_increment resequencing, resulting in duplicate entry ‘1’ for key ‘PRIMARY’

   `wp_redirection_logs` table has just logs of the plugin Redirection. So I emptied the table and did the above steps again. If you use CUI, I think you can use the following.
TRUNCATE `your WP DB name`.`wp_redirection_logs`;

   But I need the contents of the table `wp_sitemeta`. So, I first emptied the table and did the above steps again. Then I clipped `wp_sitemeta` INSERT statement out from the back-up sql file and imported it to the table.

   The errors on the log file have gone and the autosave feature works well now. Mission complete!

   Don’t trust me too much because I handled the errors in my own fashion. m(_”_)m

Edit(Sep.6):
   When I updated to BulletProof Security .50.8, I had a trouble that the Notice “Network/Multisite BPS plugin Network Activation correction:” had not gone away. So, I went talk to the forum. Then I resolved the problem with his help. This trouble is related to the AUTO_INCREMENT missing again. I think it is maybe caused by phpMyAdmin bug that I read several days ago. But who knows about the truth? Sigh.

   Anyway, the Notice has gone. Now I can sleep in peace (^_^;).